
How To Boost A
Post On Facebook
© 2018 Lead Horse Marketing
1. Your first step is to review the post you want to boost. Once you have boosted a post, you
cannot edit it without ending the boost. So, look it over for grammar and spelling, as well
as making sure all details are correct (e.g., sales price, phone number, date and time of
event, etc.).
2. Next, consider your goal with the post: are you driving traffic to your website? Looking to
generate leads? Increase app installs? Make sure your post has a clear Call-to-Action so
that people who engage with the post know what to expect.
3. Lastly, pick the right image. Remember, if you use an image in the post you want to boost,
make sure it adheres to Facebook’s text overlay tool. While a regular post can have a
picture with a lot of text overlaid, an image for a boosted post (like an ad) can only have
so much text. When advertising with an image, Facebook only allows an image to contain
around 20% text without penalty. Anything more than that and Facebook will reduce
reach, up to and including not showing the ad/boosted post at all.
To sum up, you have…
➡ Reviewed your post for grammar, spelling, and content,
➡ Determined what is the marketing objective for the post,
➡ And made sure any image with the post adheres to Facebook’s text
overlay policy.
You are all set to boost the post!
Where to Begin?
So, you have a post you would like to share beyond your immediate reach.
You’ve read about why you should boost your post, considered the pros and
cons, and are ready to take the plunge into the world of boosted posts.
What do you do next? The process has a few important steps – let’s break it
down:
© 2018 Lead Horse Marketing
Boosted Post vs. Promoted Post
Before you click that “Boost Post” button, consider this: Facebook actually
has two options for you. You can boost a post directly from your post feed
or “promote” a post from your Ads Manager. Both have their pros and cons:
© 2018 Lead Horse Marketing
News Feed Boost Ad Manager Promotion
PRO CON PRO CON
It's Fast! You can
click on the Boost
button below the
post to get started.
Limited Marketing
Objectives: Can only
drive for Engagement
or (if there is a link in
the post) Website
Visits)
All Marketing
Objectives: Every
marketing objective
is available for use
Takes Time: Using
the Ad Manager is a
longer process
Reporting At A
Glance: Just check
Promotions in your
Insights
Limited Placement:
Only shows on
Facebook
More Placements:
Show across
Facebook ,
Instagram, and the
Audience network
—
!
Quick Tip: While the convenience and ease of the News Feed Boost is a plus, we at Lead
Horse recommend using the Ad Manager Promotion for all the options it offers. As such, we will
continue with our How To by going through the Ad Manager process.
Next, learn how to use the Facebook Ad Manager.
The Facebook Ad
Manager
The Facebook Ad Manager
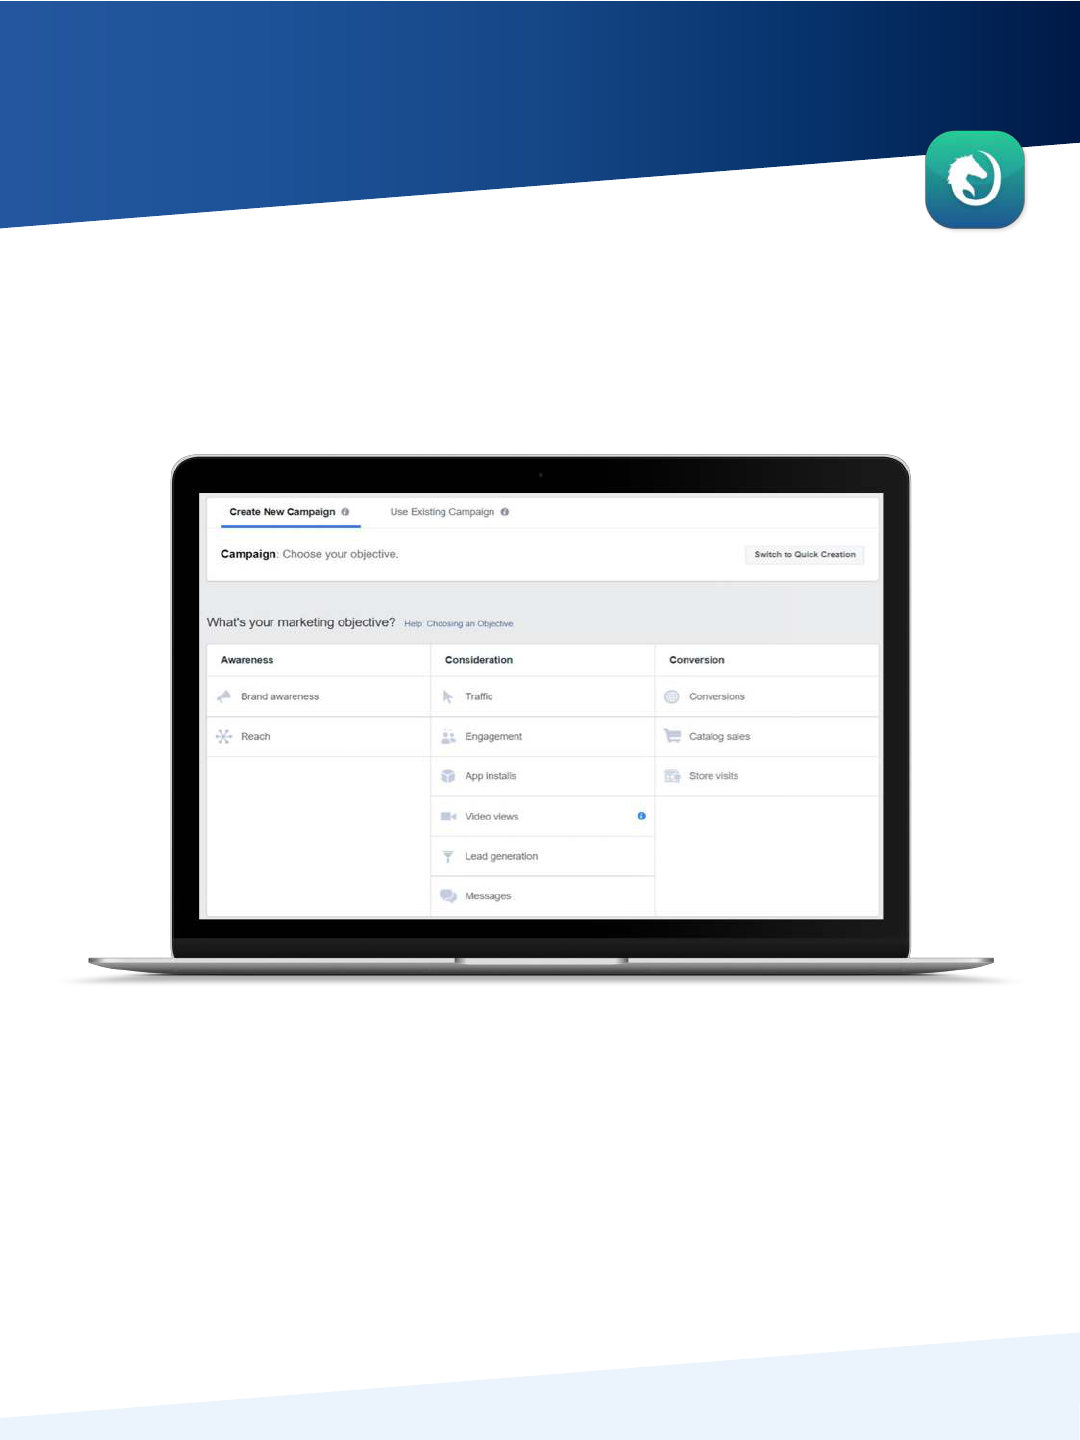
Your first step in the Ad Manager is to create a campaign for your boosted
post. Remember when we asked what your marketing goal will be for you
post? It’s time to apply that answer.
© 2018 Lead Horse Marketing
When you create a new campaign, you will be asked your objective. Facebook will optimize
your campaign for the appropriate targets – namely, people likely to complete your specified
objective.
In our current example, we want people to engage with the content of our post by
commenting, reacting, and sharing the post with others. Engagement is the best objective
for us.
The Facebook Ad Manager
(Continue)
© 2018 Lead Horse Marketing
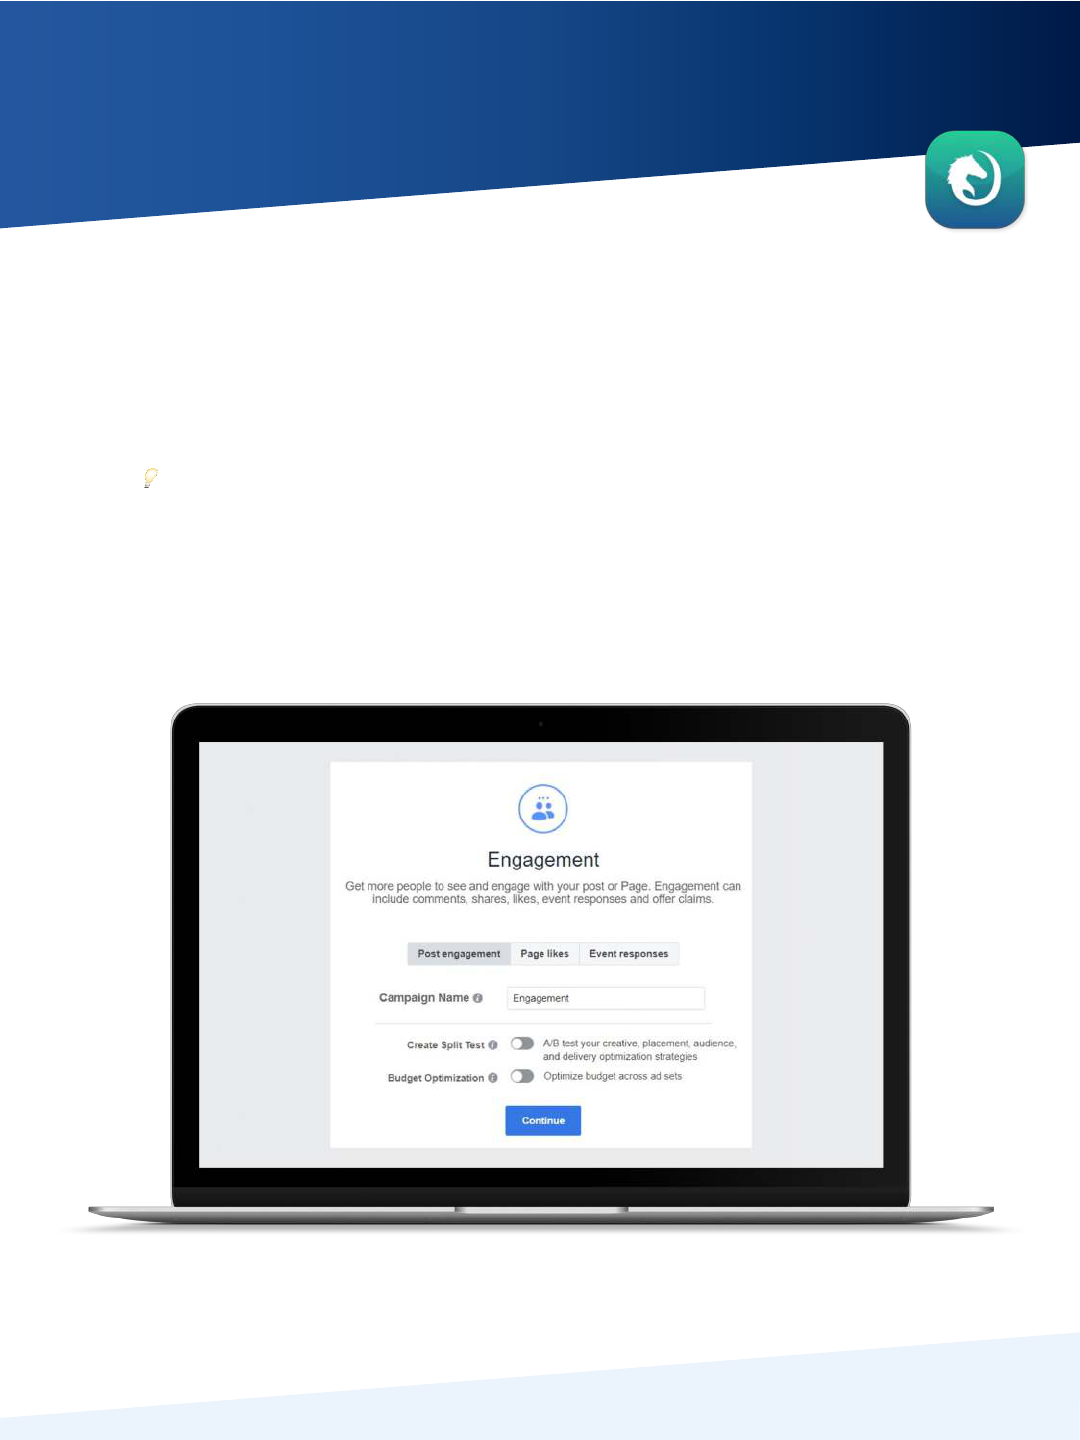
When we click on Engagement, we are given the option to specify
our Engagement goal.
Choose from: Post Engagements, Page likes, and Event Responses. Since our post is
about an article, Post Engagements is the best fit.
!
Quick Tip: Make sure to give your campaign a name that clearly signifies the content
and purpose of the campaign!
Lastly, Facebook gives us the option to create a split tests or utilize budget
optimization. Since we only have the one post today, these are not useful for our
immediate goal, but are great with larger, more established campaigns.
The Facebook Ad Manager
(Continued)
© 2018 Lead Horse Marketing
After clicking Continue, you are brought to the Ad Set Level.
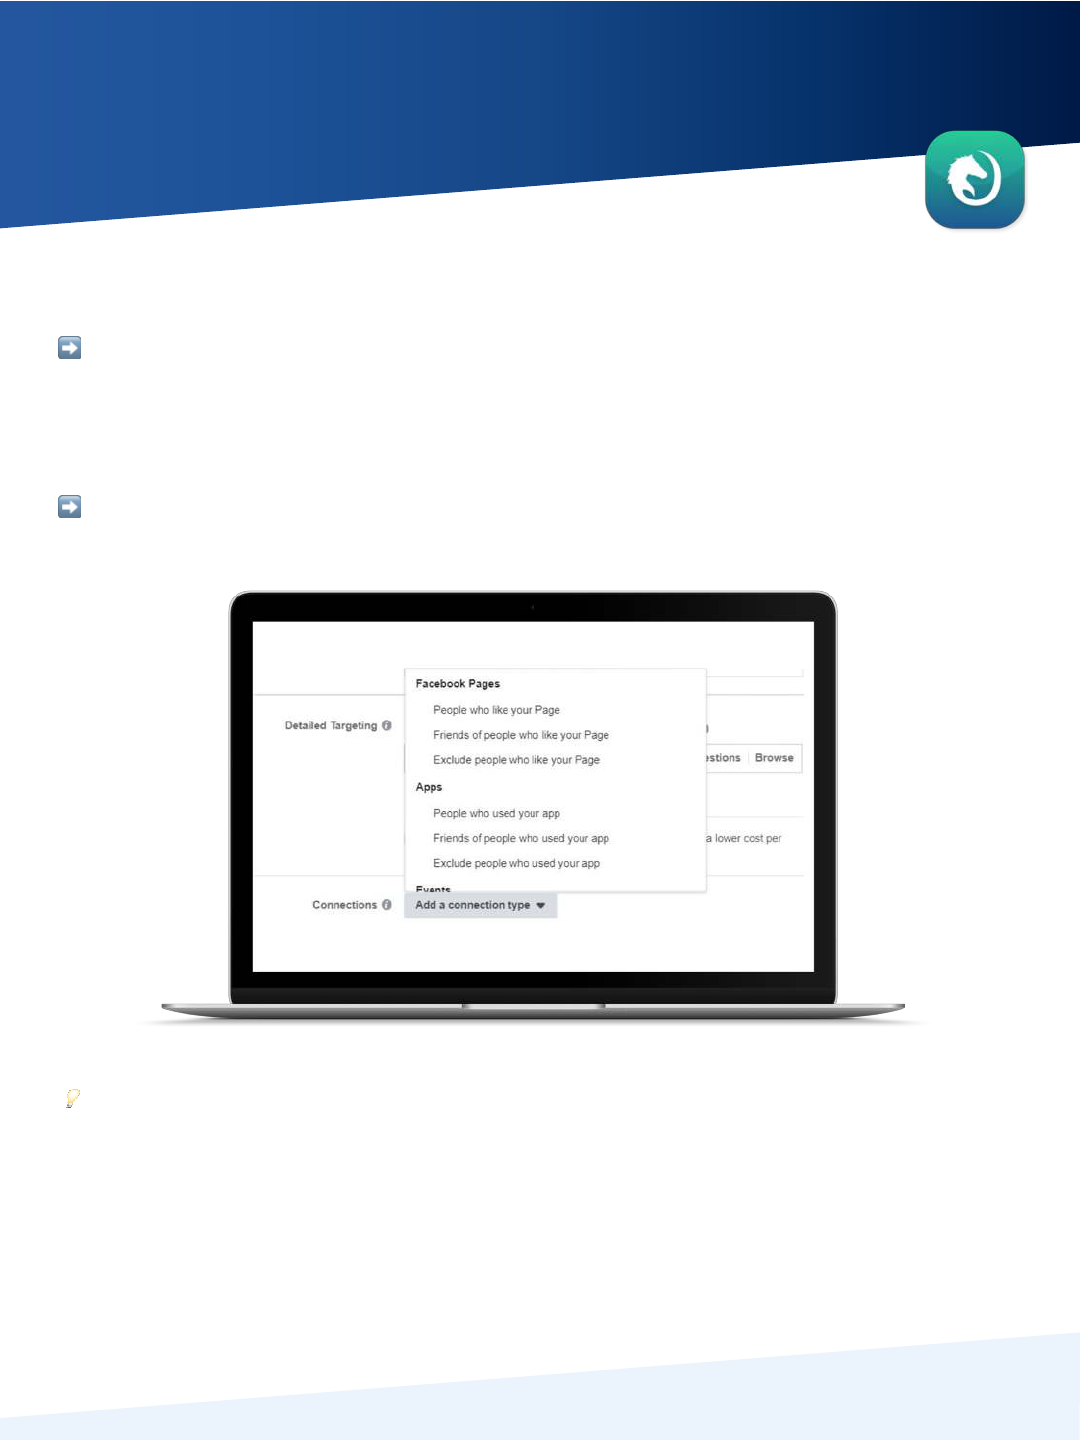
➡ Your first task, after naming your ad set, is selecting the audience you want to see your post. You
have the full range of Facebook’s targeting available to you: location, demographics, interests,
behaviors, and more. While all are helpful targeting tools, they aren’t the best fit for boosted posts.
Since this is a post you want to be seen beyond organic views, we recommend skipping those tools
and going to Connections.
➡ From here, you can select People Who Like Your Page. You can even expand to Friends of People
Who Like Your Page, but keep in mind that friends may not be as interested in your post.
"
Quick Tip: Once you select People Who Like Your Page,
make sure to select your page in the text box
.
The next section is Placements.
From here, you can decide where you want your boosted post to show. Since it is a post, Facebook can
only show it in certain placements, so leave this on Automatic Placements. Facebook will show your
boosted post everywhere it can be seen!
The Facebook Ad Manager
(Continue)
© 2018 Lead Horse Marketing
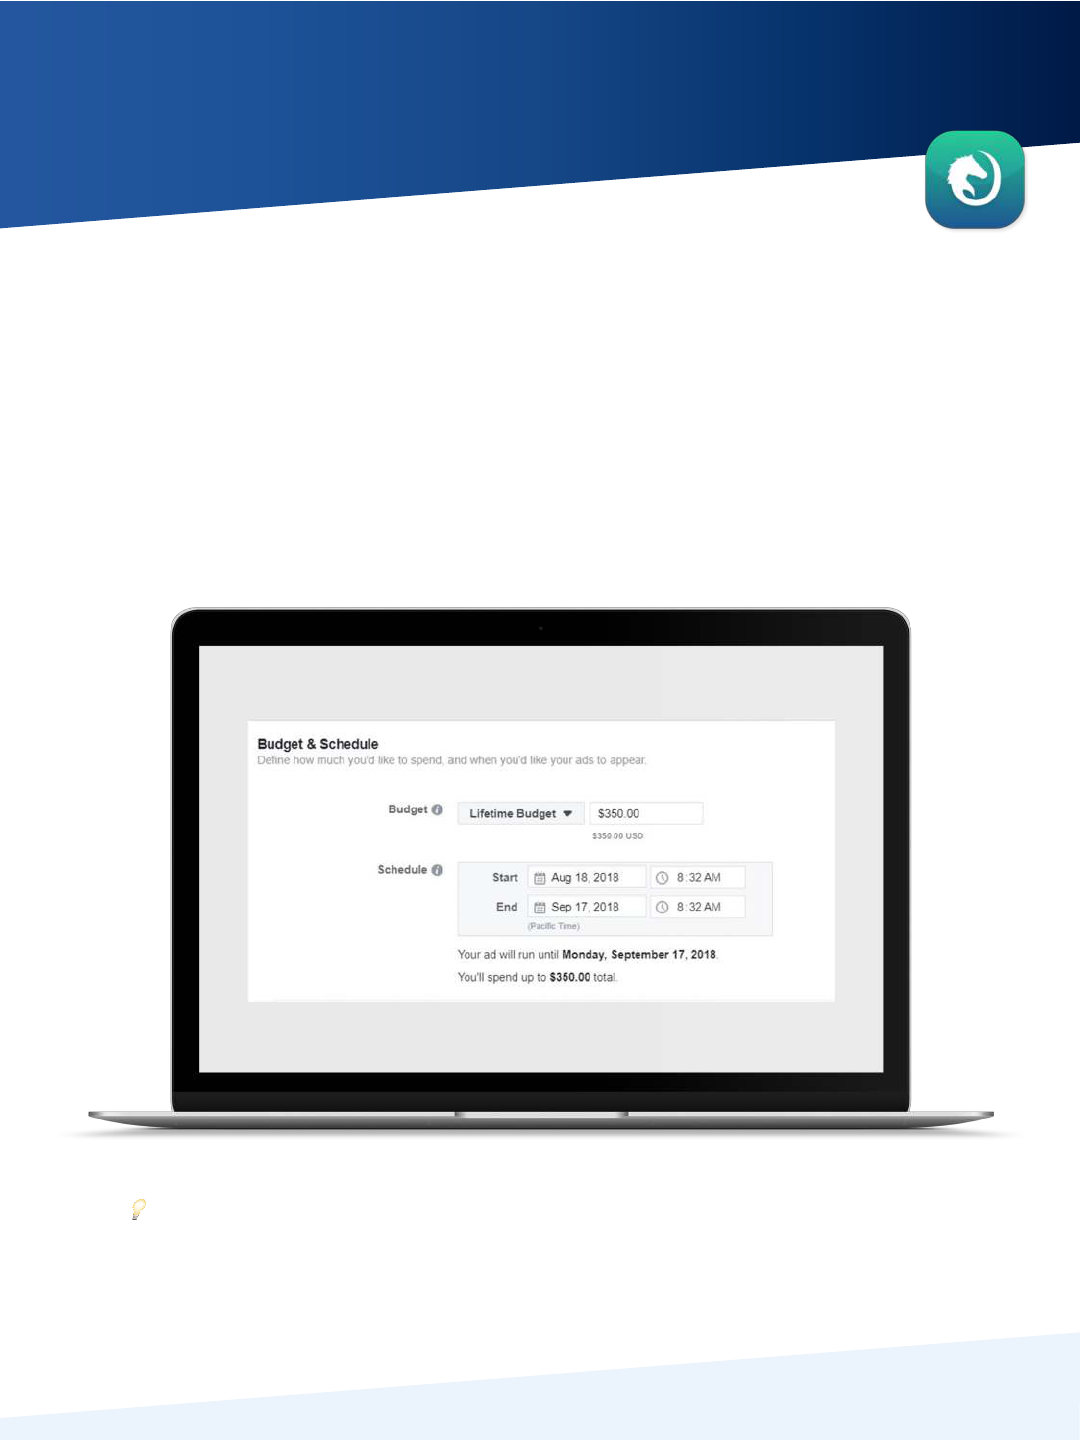
Last on the Ad Set level is Budget & Schedule. You can schedule an ad to
have a start and end date, or to run continuously. Which you should pick?
Consider once again the marketing goal of your post: Are you driving people to your
site for a sale? When does it end? Are you promoting an event? When does it take place?
Or are you promoting an app that you just launched?
!
Quick Tip: While it may be tempting for posts and goals without specified end dates
to run continuously, keep in mind that your likers can experience ad fatigue and stop
interacting with your post if they see it too often or for too long.
The Facebook Ad Manager
(Continue)
© 2018 Lead Horse Marketing
You can also choose to whether to set a daily budget, or, if you set a
scheduled start and end for your boosted post to run, a lifetime budget.
➡ With a daily budget, Facebook can increase or decrease how much you actually
spend each day depending on how well they think the post is performing each day. The
spend will average out to your daily budget, but it may not be exact.
➡ With a lifetime budget, your budget will be spent much like the daily budget, spread
out over the course of your scheduled days. However, you will notice higher or lower
spend each day depending on performance – but you will not spend more than the total
budget you have set. For scheduled posts, Lead Horse recommends using a
lifetime budget, especially if the post is scheduled to end before late at night the last
day it is scheduled.
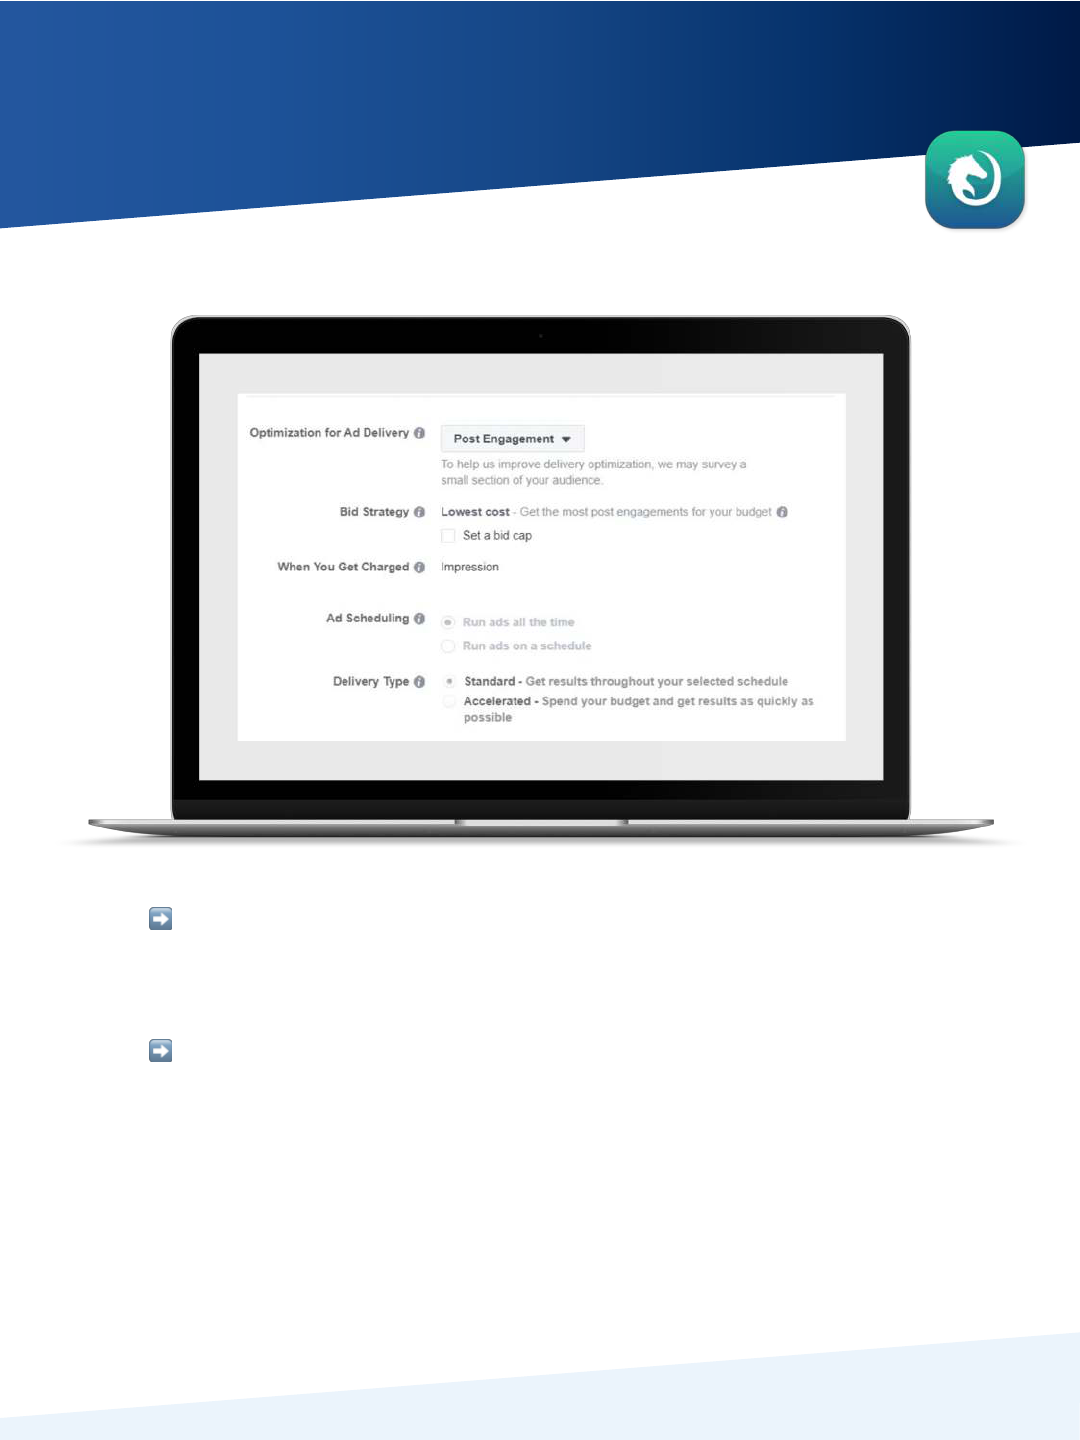
Finally, there is a section for optimizing your spend. You can change the
Optimization for Ad Delivery, your bid strategy, ad scheduling, and delivery
type.
➡ Ad Delivery defaults to your marketing objective, but you can also change it to
Impressions to be delivered as many time as possible, or to Daily Unique Reach to be
seen once a day by as many people as possible. Again, what you should pick is based
off your goal, but the default will often be your best bet.
➡ With Bid Strategy, Facebook will default to getting the most of your goal for the
lowest cost, but cost may rise the longer the boosted post runs. You can choose to
protect yourself from that potential higher cost by setting a bid cap.
"
Quick Tip: With bid caps, make sure you do not set it too low to begin with or you risk not
getting any performance at all.
The Facebook Ad Manager
(Continue)
© 2018 Lead Horse Marketing
➡ For Ad Scheduling, you can further decide when your post shows by either
letting it run all the time, or selecting days of the week and hours of the day when
the post shows. This can be helpful for limiting when your posts to peak times
during the day.
➡ With Delivery Type, you can choose between Standard, which spreads your
spend to get results throughout the day or scheduled time, or Accelerated, which
spends your budget to get results as quickly as possible, which risks running out of
budget for later in the day.
Now, you are ready to create your ad!

Creating the Ad
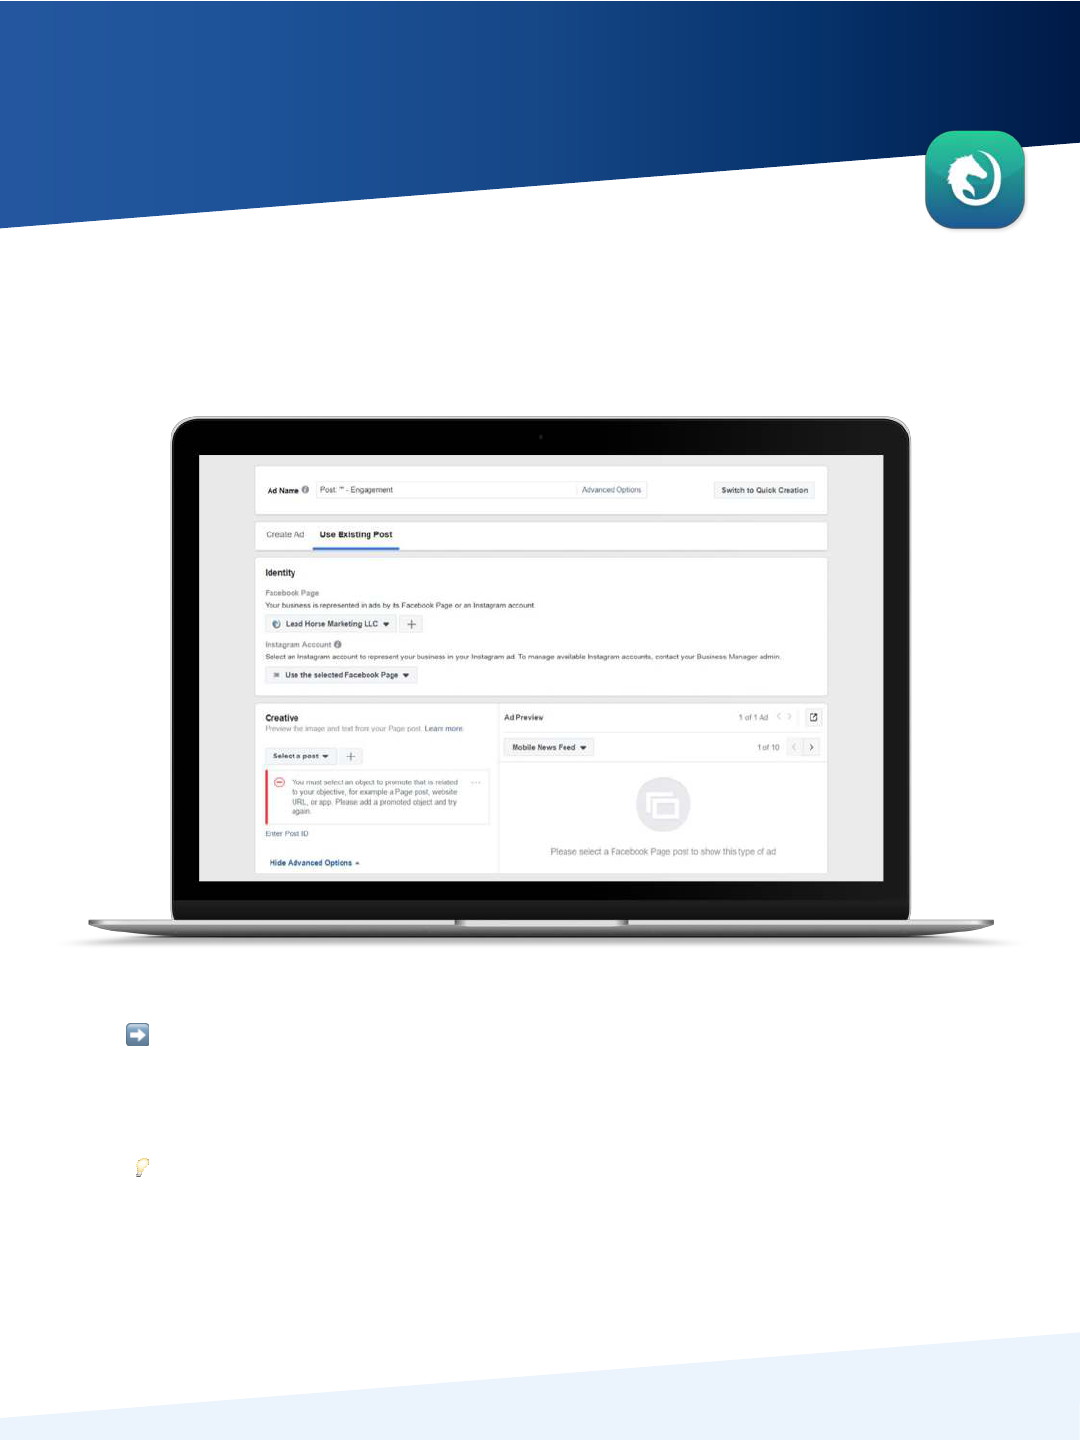
Creating the Ad
Finally, we have made it to selecting the post that you will boost!
© 2018 Lead Horse Marketing
➡ The first thing you need to do is select your Facebook Page. If you have multiple
pages that are tied to your Ad Manager, it is incredibly important that you select the
right page. You don’t want one client paying for another client’s boosted post!
"
Quick Tip : Once you have selected a page, you can also choose to tie the ad to an
Instagram account. This is another way of expanding where your ad shows, so if you
also run an Instagram account for your business, consider including it.
Creating the Ad
(Continue)
© 2018 Lead Horse Marketing
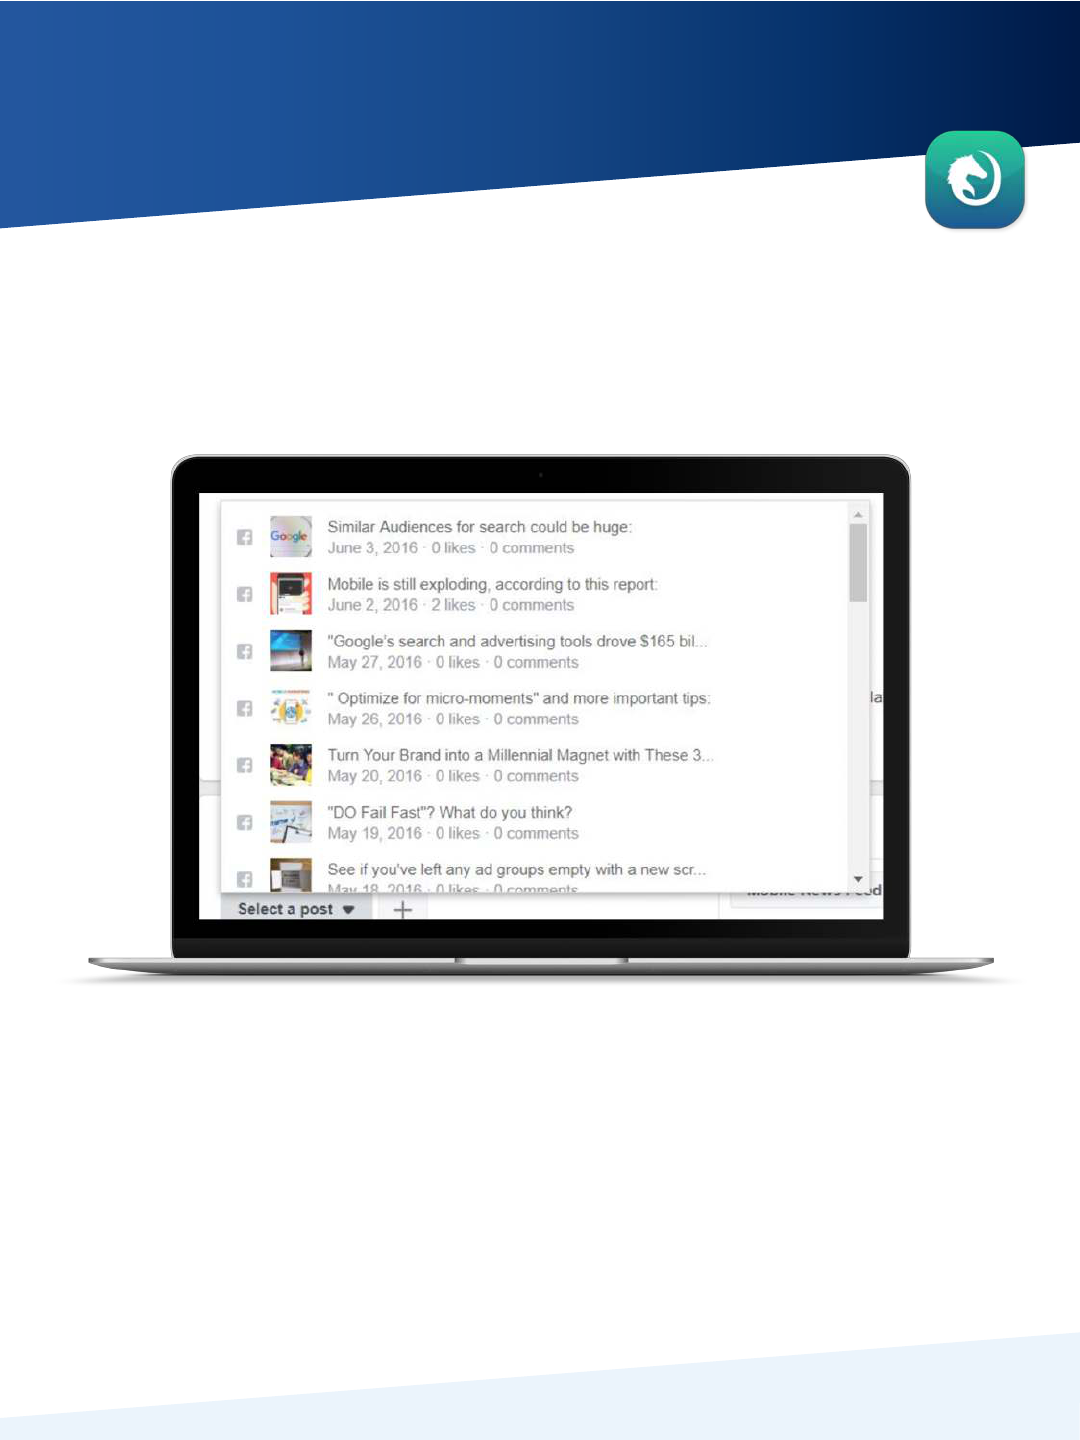
Next, you will select your post. Facebook sorts posts
chronologically, with your most recent post at the top.
Once selected, your post will show in the Ad Preview to the right, where you can click
through to see how your post will show on multiple placements. You may see some
placements where your boosted post won’t show. Not to worry. These are video
placements, and since the post is not a video, it makes sense not to show there.
Creating the Ad
(Continue)
© 2018 Lead Horse Marketing
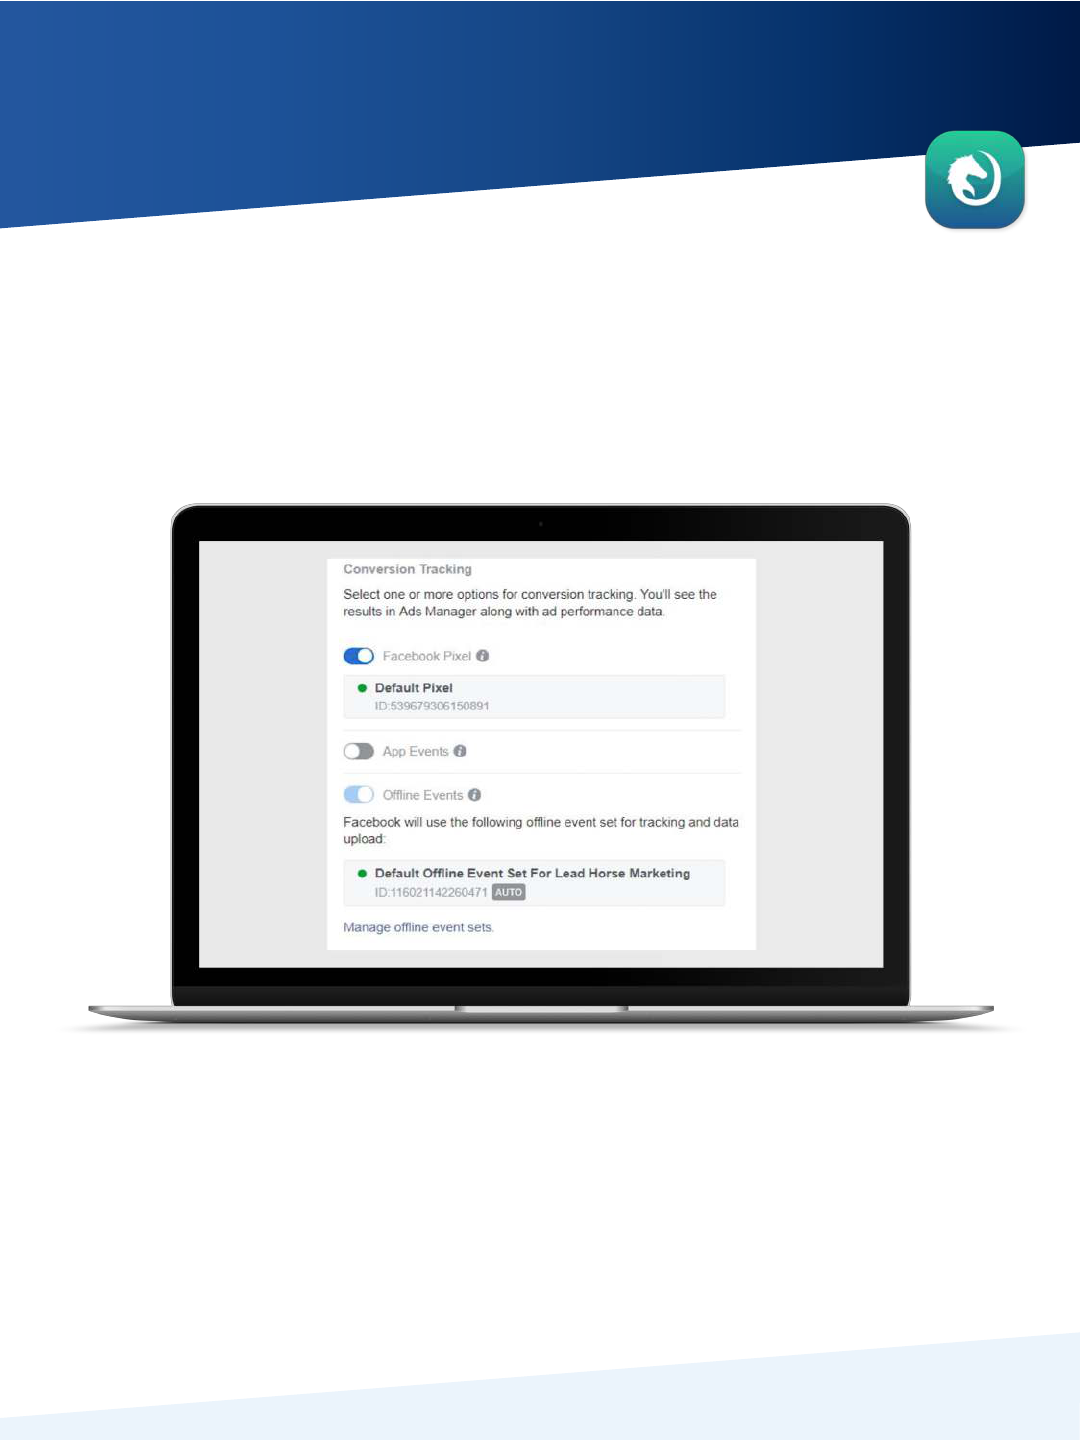
Lastly, you can select how you want to track conversions.
This is once again dependent on your marketing objective, so if you are promoting an
app, you’ll want to track App Events. However, for most boosted posts, having the
Facebook pixel and Offline Events turned on will work for you.
All that is left to do now is to review your campaign, ad set, and ad, and then hit Publish.
You have now successfully boosted a post!

© 2018 Lead Horse Marketing
